
Whether you want to test specific cases in smart contracts or find edge cases, Echidna is a popular automatic bug detection tool that helps you dodge resource leaks or crashes.
Echidna is a fuzzing tool for smart contracts with input generation based on the contract’s ABI (Application Binary Interface). In other words, Echidna generates several random transaction sequences from a smart contract’s ABI and then assesses all of them.
Instead of one unit test covering one input, you cover thousands of inputs with Echidna. Basically, you’ll find bugs that are otherwise difficult to find.
Echidna’s other benefits include:
- it’s almost ready to use – you download and run it
- offers good results in short fuzzing campaigns
- it’s easy to integrate into your CI pipeline
Read on and I’ll guide you on how to set up Echidna tool, learn about its debug functions, and how to initialize a contract.
How to Set Up Echidna – Required Steps
Local Setup
MacOS/Linux
You can install Slither and download precompiled binaries. Or install Homebrew and download Echidna and its dependencies by running:
brew install echidnaTo install the latest master branch code, you can run this command:
brew install --HEAD echidnaDocker
Use Docker to install Echidna’s latest version:
Echidna Docker
docker run -it -v "$PWD":/home trailofbits/echidnaYou can also rely on ETH security toolbox docker image:
TrailOfBits Docker with Security Toolbox
docker pull trailofbits/eth-security-toolbox
docker run -it -v "$PWD":/home/training trailofbits/eth-security-toolbox
Find the second instruction copies of the current directory inside the docker container at:
/home/training. Try the following command to access it:
cd /home/training.Docker On a VM
From multiple runs, it seems that Echidna crashes if the VM instance has less than 7GB RAM.
Solidity Version For Echidna
After you start the Docker container, install the Solidity version utilized by smart contracts. This way you can compile the contracts and run the fuzzer.
To list all installed Solidity versions:
solc-select versionsThis will return an error on the trailofbits/echidna docker image. That is simply because the image doesn’t have any Solidity compiler version installed.
- To see the list of compiler versions:
solc-select install- To install a version:
solc-select install <version>Example:
solc-select install 0.8.17If you have multiple Solidity versions installed, select one as such:
solc-select use <version>Running Echidna
Try the following command to run Echidna:
echidna-test Contract.solYet, if the Contract.sol file contains multiple contracts, specify which one to run:
echidna-test Contract.sol Contract1Try this command to run the contract with a config file:
echidna-test Contract.sol Contract1 --config=echidna_config_file.yamlExtending Echidna Docker Image
I recommend NOT using the toolbox images in this case. Instead, use trailofbits/echidna images because they are lighter and get automatically built on new Echidna releases.
Dockerfile Example:
FROM trailofbits/echidna
COPY . src
WORKDIR src
RUN solc-select install <VERSION>
RUN solc-select use <VERSION>
ENTRYPOINT ["echidna-test" ,"<PATH_TO_CONTRACT_FILE>", "--contract", "<CONTRACT_NAME>", "--config=<PATH_TO_CONFIG_FILE>"]
Other Examples:
<VERSION> --> 0.8.17
<PATH_TO_CONTRACT_FILE> --> ./contracts/ContractExample.sol
<CONTRACT_NAME> --> ContractExample
<PATH_TO_CONFIG_FILE> --> ./echidna-config.yaml
Echidna’s Configuration File
You can find a complete example of Echidna’s configuration file here.
Types of Testing With Echidna
Properties or Invariants
Properties or Invariants are Solidity functions that have no arguments and return a boolean. By default, their name must start with echidna_, but you can change this from the configuration file by updating the prefix field.
Echidna will try to break the invariant and prove that the property can be false. For example, if you have a price variable that should never be outside the range of 10 – 100, you can write the following invariant:
function echidna_check_price() public view returns(bool){
    return (price >=10 && price <= 100)
}
Where do you write the properties?
It’s best to inherit the contract you want to test and write the properties in the newly created contract. This way, you separate the properties from your contract:
contract TestContract is Contract{
    function echidna_check_price() public view returns(bool){
        return (price >=10 && price <= 100)
    }
}
What happens when you run Echidna?
- Automatically generate arbitrary transactions to test the property.
- Report any transactions leading the property to return false or throw an error.
- Discard side effects when calling a property (i.e., if the property changes a state variable, it is discarded after the test).
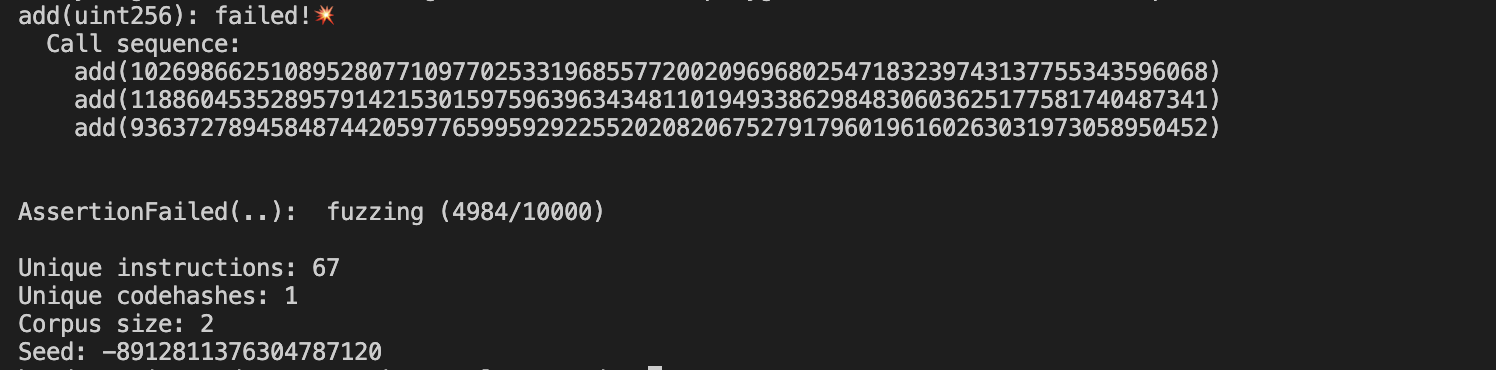
Assertions
Assertions can be used as an alternative to properties to check whether the behavior of a certain operation is correct or not.
Example:
contract Contract{
    uint256 private total;
    function add(uint256 value) public{
        uint256 oldTotal = total;
        total += value;
        assert(oldTotal <= total);
    }
}
In the above example, the test will never fail with Solidity version 0.8.x (the overflow is checked in compilers > 0.8).

In lower versions like 0.7.x, however, the test is bound to fail.
How to Debug Functions
If you want to debug a function, simply place events inside it and set the testing mode to assertion in the configuration file. This helps print a stack trace with all the events emitted in the failed function.
As the constructor can’t be debugged, try building a function (so you can debug it!) and calling it instead of writing code inside it.
How to Initialize a Contract
Initializing a contract for Echidna is rather complex. The easiest way to do it is through a constructor. But there’s a catch: the constructor can’t have any arguments.
So, what can you do if your contract constructor comes up with some arguments? Here’s a solution: hardcode or, in case your contract depends on other contracts, deploy them.
Example:
contract Token{}
contract Contract{
    address private token;
    constructor(address tokenAddress){
        token = token;
    }
}


contract Initializer{
    function init() returns(address){
        address tokenAddress = new Token();
        return tokenAddress;
    }
}


contract EchidnaContract{
    address private token
    constructor () {
            Initializer initializerContract = new Initializer();
            token = initializerContract.init();
What to Keep In Mind
While writing fuzz tests isn’t a piece of cake, it’s a skill that will pay off in the long run whether you’re a Web3 builder or auditor.
What you need to keep in mind about fuzz-testing with Echidna is:
- test your properties/assertions as frequently as you can so you can easily track bugs on them; running more properties/assertions at once makes it difficult to debug later on
- you’ll have to deploy mocked contracts; for example, for token, send funds to the callers(default are: [“0x10000”, “0x20000”, “0x30000”]) and the deployer is 0x30000.
- to make sure that a property/assertion is actually running, introduce a known error on purpose inside it, and test to see if it fails
- by default, the main contract deployed is at the following address:
0x00a329c0648769a73afac7f9381e08fb43dbea72
That’s it on how to set up Echidna.
Stay tuned for the next articles to dive into more details about Echidna!

 Solving Ethernaut Level 29: Switch
  How to Double-Check Smart Contract State Changes with Hardhat Tasks